Thursday, December 30, 2010

Buckwheat & Buttermilk Pancakes

What do you do when you discover you have the pox (shingles) and can't leave the house for fear of infecting small children, pregnant women and adults who, for some strange reason, forgot to get themselves a good dose of chickenpox as kids?  In my case, you plan out your food blogging for the next month and then make yourself some yummy breakfast.

Although Mr J is generally the pancake maker in this household (Note to all men: making pancakes every Saturday morning for your lady friend is a good way to both woo her and fatten her up), this morning I decided it was time for me to get my pancake making on and whip up something special for our breakfast... I was also feeling guilty that my having the plague means that Justin can't spend New Years with his friends who, sadly, are all either pregnant or have small kids.  The perils of the thirty-something set...


Anyhoo, I digress. Pancakes.  Now, ever since my father first introduced me to pancakes in the US when I was a little girl I have eaten these delicious cake-at-breakfast delights at every opportunity that has presented itself.  Always I have been torn between the two halves of the pancake world - the light and fluffy buttermilk pancake, and the dark nuttiness of the buckwheat.  Deciding between these two is the eternal dilemma for every pancake sitting.  But no more!  Today I combined the two and I am very please to say it turned out rather well.  Possibly next time I will do Mr J's trick of whipping the egg whites separately and then folding them in with the rest of the batter.  This produces an extra light and fluffy pancake, but for this morning I settled for the basic product.  So, here it is, the best of both worlds.

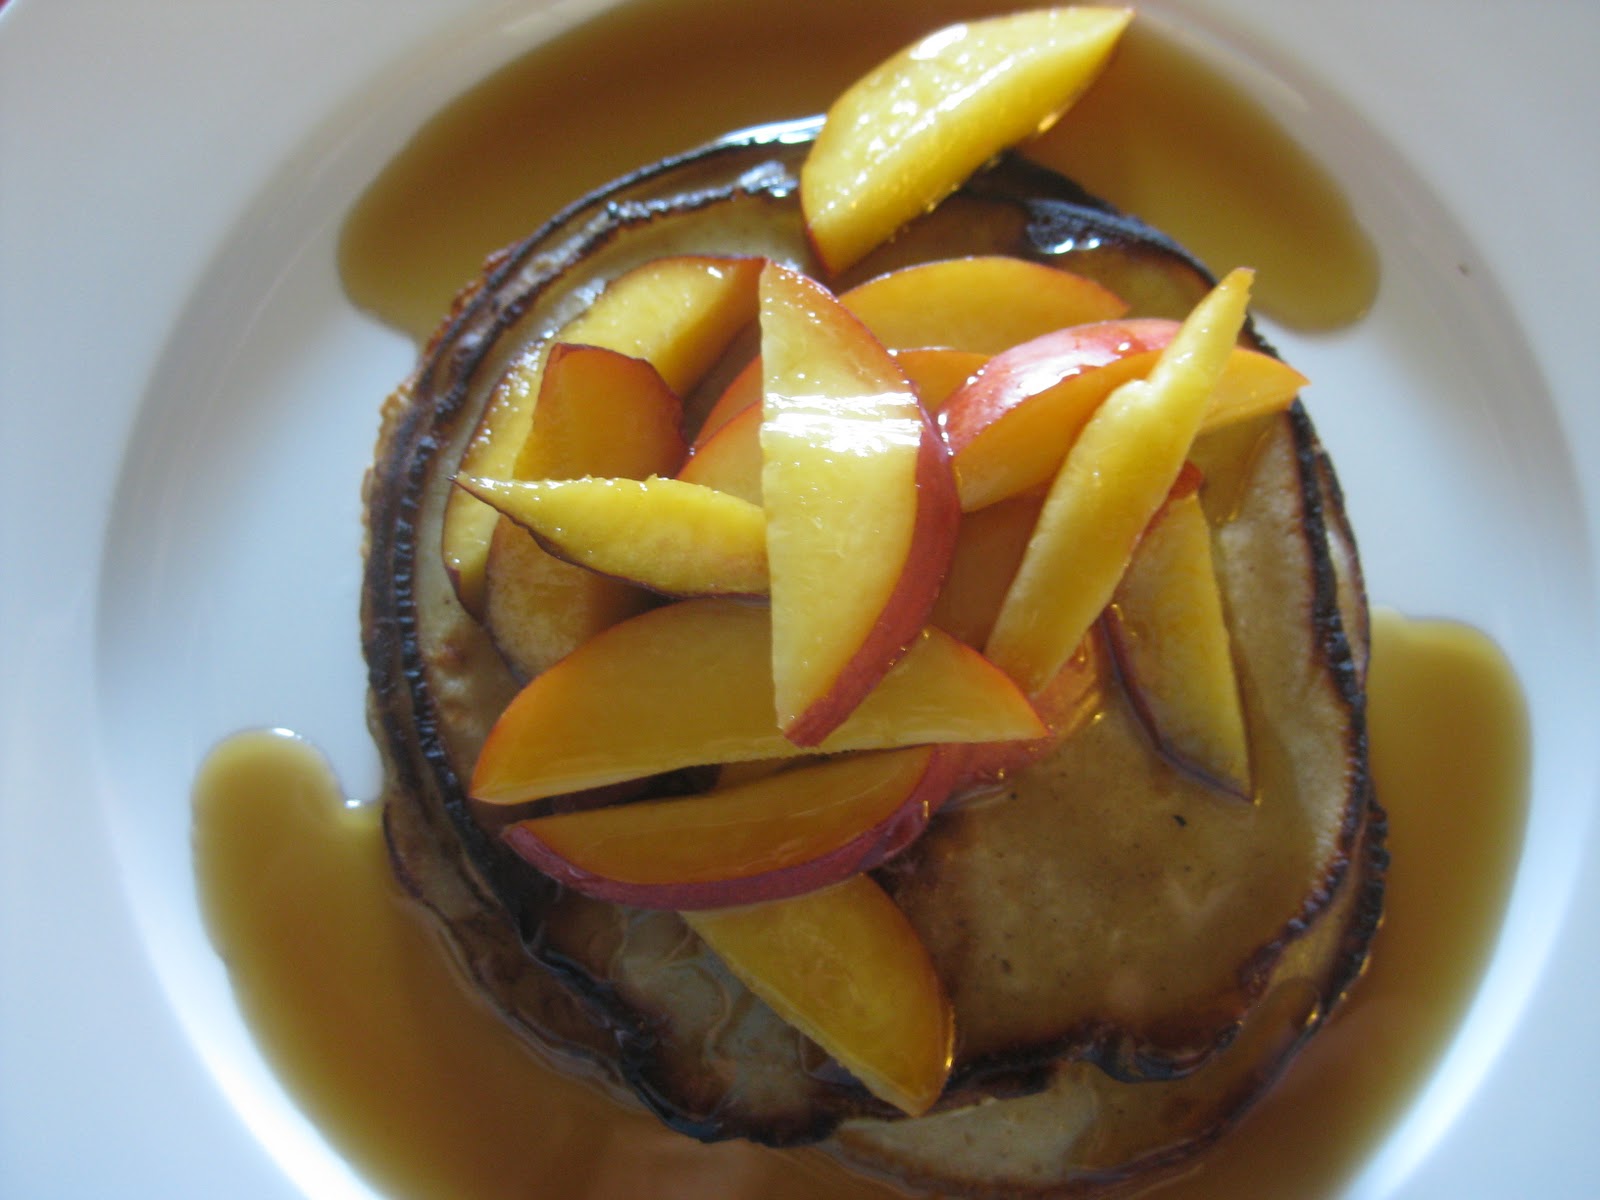
Buckwheat & Buttermilk Pancakes with Maple Syrup and Nectarines


Ingredients:


-  1/2 cup buckwheat flour (in my case, I apparently bought an organic product too)
-  1/2 cup plain four
-  1/2 cup milk
-  1/2 cup buttermilk
-  1 tsp cinnamon
-  1 tsp baking powder
-  1 tsp vanilla extract
-  1 egg
-  2 tablespoons white sugar
-  1 tablespoon olive oil (or other vegetable oil.  Personally, I think peanut oil would add to the nuttiness of the buckwheat)


Throw all the dry ingredients except the cinnamon into a large bowl and whisk together to combine.  Then add in the egg, milk and buttermilk and whisk until it looks creamy, but not too much or else it will make it a bit chewy.  Then pop in the vanilla extract and the cinnamon and combine.  Add in the oil and stir just enough for it to thin out the batter.


Now unleash your biggest frying pan, heat it up on the hob and grease it with butter until it's good and sizzling hot.  Using a soup ladle, pour in either one big pancake or two more modest-sized pancakes.  


When bubbles are beginning to form it's time to flip them - and don't leave it too late or it will burn.  And try to use a nice flat spatula, it's much easier to flip with the right implements.  Once they're done, I like to keep them warm on a plate in the oven (about 110 degrees) until they are all ready.


Given the wonderful availability of stone fruit at the moment, I decided to serve these delicious babies with sliced nectarines and pure maple syrup... maple flavoured syrup is the devil's spawn and must be avoided at all costs.   I also set the table and we ate like adults.  A fabulous distraction from being quarantined for New Year's Eve.


Leftovers, oh how I love thee...

Oh leftovers, how I love thee.  Just when you think your Christmas roast has given all it has to give, it morphs into something even yummier!  Mr J was inspired by the zip-lock bag of juicy remaindered pork spit roast to make some wonderful pork rillettes, which will be the subject of a boy-blog at a future date.  Meanwhile, I tackled the remains of my Mum's roast turkey.  I'd remembered a Delicious Magazine recipe I have been dying to try for ages.  Every time I'd seen it in the book it had looked so (unhealthily) irresistible, but I'd never had any cooked roast turkey meat lying about.  But this time, aha!  I did indeed have a whole pile of turkey just staring at me from the fridge.  It was time.  Time for turkey pasta bake.


Unfortunately, the inspiration to make this dish struck me very late in the afternoon on a day when the shops were very definitely not open, so it was a matter of make do and mend with the recipe's ingredients.  As a result, I have made a somewhat different version of the bake, but it was very very yummy nonetheless.  A little too delicious for something that has so much butter and cream involved.

Leftover Turkey Pasta Bake

Ingredients

-  500 g diced cooked turkey meat
-  95 g butter (I prefer salted, but feel free and get unsalted if that's your thing)
-  50 g plain flour
-  850 ml chicken stock
-  1/2 teaspoon nutmeg
-  200 ml thickened cream
-  200 g pasta (I used farfalle, but whatever you have would be just fine)
-  2 tsp lemon zest
-  juice of 1/2 a lemon
-  1/2 tbsp olive oil
-  200 g sliced mushrooms
-  2 cups baby spinach
-  60 ml white wine
-  2 tsp thyme, chopped
-  50 g flaked almonds
-  50 g grated parmesan  (please, please not the pre-grated, processed stuff - yuck yuck yuck)

I started off heating up my oven to 180 degrees celcius.  Meanwhile I heated up some water to cook up the pasta (with a splodge of olive oil to make sure the pasta doesn't stick while it cooks).   When it was boiling I dumped in the farfalle - I think it would probably look more yummy with macaroni, but it doesn't make a bit of difference to the taste.


While the pasta is bubbling away, melt 75g of the butter in a saucepan on a medium-low heat then add in the plain flour, stirring until it looks like a thick, lemony paste.


Stir for about 2 minutes, presumably to cook out the floury taste, and then whisk in the stock (and whisking really does work better than stirring - I tried stirring and failed dismally).  When it's good and combined bring the lot to the boil, then reduce the heat to a simmer and leave it to cook away for 5 minutes.  Remember to stir constantly so it doesn't stick on the bottom of the pot, which is a pain in the rear to clean up.  Throw in the nutmeg, the lemon zest and the cream, and then simmer for another 5 minutes.  Salt to taste (I used truffle salt which was wonderfully aromatic, but not everyone has that to hand).  When it's done, turn off the heat and leave well enough alone.


The pasta should be good and ready by now - don't forget to keep checking it while you're doing your pseudo-bechamel sauce with the butter and the flour and the cream!  Tip the cooked pasta out into a colander and rinse under cold water to stop the pasta from cooking further and getting too mushy for it's own deliciousness. Then tip in the olive oil and stir to make sure nothing sticks while you finish off the rest of the dish.

Meanwhile, liberate a medium-sized frypan from your pots-and-pans drawer.  Pop it on a medium-heat and add in 20g of butter you have left.  When it's melted, throw in the sliced mushrooms and toss about until they're brown and starting to shrink a little.  I ended up throwing in a little bit of olive oil to assist, as I found this a little dry without it.  This should take about 2 minutes, then throw in the cooked baby spinach, the wine and lemon juice.  Cook a bit longer, until the spinach is wilted properly.


The best bit about all this fuss, is how you chuck all these various bits and pieces you've been juggling into a large bowl - the creamy bechamel, the pasta and the mushrooms-and-spinach.  Mix it up with the turkey pieces and the thyme and then spread it out in a large lasagne dish or baking tray.  Sprinkle the flaked almonds over the top, then grate the parmesan and pop it straight into the oven.  30 minutes and you are ready to eat.  Tasty, tasty leftovers.  And the best bit is, for the vegos out there, throw in more mushrooms and spinach, maybe even some baked sweet-potato or pumpkin, and you've got yourself one hell of a dish.

Sunday, December 26, 2010

Christmas Day extravaganza


There is so much I love about Christmas, including the unabashed gorging and piggery that goes on all day long.  But I may have hit my pig-out waterloo this year.  Between my family's Christmas lunch and my boyfriend's Dad/Stepmum's dinner, let's just say a mu-mu was required later in the evening...along with a very urgent diet.

My Mum's Christmas lunch was, as always, an amazing treat with about five times as much food as you could ever hope to eat.  Highlights included the vintage Moet (love your work Mum)...


...the fresh South Coast oysters (Sydney Rock of course)...


... a pork terrine topped with apricot compote...


... and coconut milk and chilli prawn stir-fry (oh my God, what a way to celebrate Christmas).


There was also an amazing pork loin stuffed with onion, pancetta and baby spinach which was roasted until the crackling bubbled just right (Thanks, Mr J, my man who helped Mum in the kitchen and has now earned enough brownie points to see him through the year).   Oh, oh, and a roast turkey with cranberry sauce for my Texan uncle and our American guests.  Yum!


Then it was over to my boy's family for another amazing spread of lobster tails, roast duck, balmain bugs  and ... spit roasted suckling pig!  Snaps to Mr J and his dad for bringing the baby piggy together at the last minute as the searing heat turned to spitting rain.  They kept it together and the heart burn of all the guests involved is testament to its deliciousness - you can't stop with just one plateful.  Mmmm.  Crackling....


A quiet Christmas Eve ... and my sweet potato mash

Back when I was little, my family celebrated Christmas on the night of Christmas Eve.  Celebrating in the evening certainly makes sense in a country that is generally sweltering in the summer weather come Christmas-time, and especially when so many of us still cook up a big roast dinner, which turns the kitchen into a sauna.  These days, my family celebrates over lunch on Christmas Day, but I still miss those magic nights with the Christmas tree lights twinkling and the expectation that Santa would be making his rounds that night.  So it was lovely to have the opportunity to celebrate a smaller Christmas Eve this year at our place with my partner's Mum and sister.

My duck is watching on from the shelf behind


In their honour, we lit up the Christmas tree, bought a pasture-raised, happy chook and chilled some French champagne.  The centrepiece of the main course was the lemon-roasted chicken (so succulent and crispy-skinned) served with steamed baby broccoli and a fresh side-salad.  But for me the focus was on the sweet potato mash, which is heaven in a bowl and no mistake.  I have raved about this dish before and so I thought it was time to share the recipe love this Christmas.


The original recipe for sweet potato mash has been altered very little since I first learned how to make the dish at a local restaurant cooking class (the wonderful guy who taught us is still running classes too, check out http://3seeds.com.au/index.php/news/).   It's simple as can be, and always receives rave reviews for its sweet spiciness and satiny texture.  Please note that nothing about this recipe is terribly exact and even with quite a bit of variation in the quantity of each ingredient you will produce a never-fail result.

Ingredients
-  3-4 orange-fleshed sweet potatoes
-  6 peeled garlic cloves
-  300ml thickened cream
-  pinch of nutmeg
-  salt and pepper to taste
-  1 tablespoon maple syrup

First, heat your oven up to 220 degrees celsius.  Then peel about three large orange-fleshed sweet potatoes (or four medium-sized ones) and slice into pieces about 1 inch thick.  I will often cut the bigger slices in half to minimize cooking time, but it's really not a problem if you throw them all in the baking tray with a minimum of fuss.


Now that the chopped sweet potato is in the baking dish, throw in the peeled garlic cloves.  You don't need to chop them, crush them or mess about with them.  Just throw them in.  Then glug (because, in my opinion, thickened cream doesn't pour, it glugs) over the top just enough thickened cream to pretty much cover the sweet potato and garlic.  I used about 300ml this time around, but it's not an exact science, which is why the next photo ia intended to be illustrative of roughly the right amount of cream to use.  Note: this is not a dish for dieters, which is why it's perfect for Christmas.  After all, in for a penny, in for a pound (or two, or three).


Now, pop it into the oven.  Relax.  Pour yourself a glass of champagne, or egg nog if you are so inclined.  My boy unpacked one of these lovely ladies I had bought him from our local boutique beer shop, Plonk.


Wait about 15-20 minutes.  If the cream is golden and bubbly, it's time to check whether the sweet potato is ready.  Poke a knife in the sweet potato and, if it's soft, you can take it out.  If either the cream isn't yet golden and bubbly, or the sweet potato isn't cooked, just return it back to the oven for another five minutes, then test again.  It should look something like this...


So, your cream has formed a golden crust and your sweet potato is ready to go.  Let it cool a little bit (but not too much) while you put on an apron - believe me if you don't put one on, you'll end up speckled in tiny golden flecks of mash from head to toe.  Then go and grab your blender stick.  Some people call them Bamix, some people stick blenders - potato, potaado.  Dump all that delicious goo from your baking dish into a large high-sided bowl (again, due to the splash-factor) and wizz it all up with your stick whizzing thingamajig.


Mmmm, sweet potato mash.  It's almost as addictive as a scheduled substance.  Mmm.  But I digress - add in a goodly portion of salt, pepper and nutmeg.  Whizz it up again and make sure you taste to make sure it's spiced up the way you like it.  In honour of Christmas, I added in a tablespoon of maple syrup this time and it really added to the darkly sticky taste of the dish.

Finally, I emptied it into an appropriately decorative dish and served it.  And ate it.  And ate seconds.  And completely forgot to take any photos.  Luckily, there was a teeny-tiny amount of leftovers, which I served up for a post-Christmas snack today, thus allowing me to show you how truly delicious this side dish (I scoff - it deserves to be the centre piece!) really is.  Bon appetit and a very merry Christmas to you.


Monday, December 20, 2010

Late night Sunday snack... plum jam, whipped cream and buttermilk scones

What do you do when you feel a mite peckish on a Sunday night (...after you've made up a delicious batch of plum jam)?  Why, whip up a batch of super fast buttermilk scones from the Southern Living Cookbook of course.  Or rather "biscuits" as they're known in the US of A.  But here a cookie is a biscuit, and a biscuit is a scone.  But I digress.


First add 2 cups of self raising flour to a nice, high-sided bowl.  And don't forget to pre-heat the oven to 220 degrees celcius.  Add 1/2 cup of butter to the flour, cut into cubes, and use a pastry cutter to mix in with the flour.  When it starts to look all crumbly, you add in enough buttermilk to bind the mix into a nice solid dough.

Turn out onto a floured bench and kneed a couple of times, but not too much or it won't be nice and flaky.  Cut into rounds with a round scone cutter (I like the scalloped edged cutters, they just look yummier), then lay out on a baking tray.  Make the clean-up easier by using baking paper - I hate greasing things up, so I just prefer to use baking paper where I can.  Then pop a bit of the buttermilk on the top with a pastry brush to give them a nice glaze when you bake them.  I use a silicone brush, also for easy clean up - just chuck it in the dishwasher and it's a cinch.  So, now they're glazed, pop them in the oven for about 15 minutes or until they are puffed up nicely and a shiny, golden brown on top.

Meanwhile, I recommend whipping up some cream.  Add in a couple of tablespoons of icing sugar and a teaspoon of vanilla extract.  Mmmmmm, chantilly cream.

When the scones are ready, take them out while they are steaming hot.  The outsides will be crispy and the insides soft and fluffy.  You don't even need to cut them in half, just use your fingers to split them.  Spread some delicious jam (plum is a good option...) on each side, then dollop with just enough cream to cover them.  Enjoy!  I know I did...

Saturday, December 18, 2010

Boy-blog: Plum Wine

You might have gathered from previous posts, but I have to compete with my boyfriend for time in the kitchen.  He's a great cook and, together with a few of his crazier friends, is often involved in many food-related shenanigans.  For instance, they've constructed a spit roast together, and roasted a variety of whole animals including pigs (Porktoberfest) and sheep (Lambzac Day).

Porktober Fest 2010


Now, with the prospect of 13 kilograms of free plums, they have embarked on a plum wine-making adventure, the first stage of which happened over the Weekend of the Plum.  Making a mash out of plums and sugar turns out to be surprisingly similar to the first stages of jam-making.  The only difference I noted was the number of "plum" jokes which inevitably ensued.  Also, the boys aren't really into finer measurements, so it's all kind of approximate.

First, pick and wash your plums.


Next, pop them in an assortment of large pots with a fair bit of water and boil them up until the skins come off and the pips float to the surface in a volcano of pink-foam.  Very manly, pink foam.


Sit back with a beer and watch the dogs play while the plum "mash" takes shape.


Next, strain the mixture.  The object of this is to remove the pips and other floating material like skins which produce pectin.  Unlike in jam, you want as little pectin involved as possible.  The boys tried to explain exactly why, but it sounded vaguely like a chemistry lesson, so I lost focus.


Now that you have a nice mash ready to go, you should clean out your home-brew keg (in case you have one handy) and then strain the liquid into it... be sure to add some cold water too, so you don't melt the plastic.  That would be bad.


Finally, mix in the sugar, add a little more water, then pop on the lid.  It has a special valve in the top to allow air to escape the keg but not to enter it.  This will (quite responsibly, I thought) stop the keg from exploding.  Which is a Very Good Thing.


Once the temperature is down around 20 degrees celcius, you can add the yeast.  And then you wait for the fermentation process to work its magic.  I'm not sure how this will all go, but given the plums were free, how bad can it be?  I'll let you know about two months from now.